Sweet Orange Semolina Tea Cakes

img_3050
Sick food photog skills you got there.

And so continues the parade of slightly ugly, not-too-sweet snack desserts. These are a take on a take on a take on Lebanese semolina cakes, and updated to be lighter. If you don’t have the orange blossom water, you can find it in middle eastern markets, some higher end grocery stores, or just add in a little extra orange or lime juice.

  • 1 cup all purpose flour
  • 1/3 cup semolina flour
  • 1/2 tsp salt
  • 1/2 tsp baking powder
  • 1/4 tsp baking soda
  • 2 eggs
  • 1 tbsp orange zest*
  • 1/4 cup orange juice*
  • 1/2 cup olive oil
  • 2/3 cup almond (or regular) milk
  • 1 tsp orange blossom water
  • Half an orange, sliced thinly into either 12 or 18 thin pieces, for garnish*

*I was able to get all of this out of one largeish navel orange, but your mileage may vary.

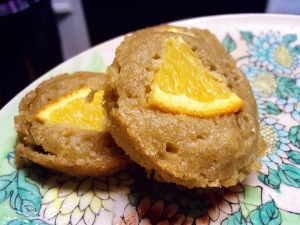
Makes 12 large muffins, or 18 tea cakes, like the ones in the picture

  1. Preheat oven to 350.
  2. Grease a muffin tin very well, or add liners to the cups. (I did not grease as well as I should have, and so they were a bit of a mess.)
  3. Combine all the dry ingredients and whisk together
  4. Combine all the wet ingredients. Use an electric mixer or hand whisk until slightly frothy.
  5. Add wet ingredients to dry ingredients. Stir until just combined. The semolina flour will leave a few lumps–that is ok. The batter will be on the thin side. Let it sit for five minutes to let the semolina absorb some of the liquid.
  6. Pour the batter into the muffin cups and garnish each muffin with a small slice of orange. (This isn’t required, but the mix of sharp orange peel and fruity olive oil is wonderful.)
  7. Bake for 20-25 minutes or until a toothpick inserted near the center comes out clean.

These cakes have a moist, tender, almost pudding-like interior, and a light crisp exterior. They’re not very sweet-more of a snack than a dessert, and have that unmistakable taste of semolina.

Nutrition Information:

Servings 18.0
Amount Per Serving
calories 120
% Daily Value *
Total Fat 9 g 14 %
Saturated Fat 1 g 7 %
Monounsaturated Fat 6 g
Polyunsaturated Fat 1 g
Trans Fat 0 g
Cholesterol 21 mg 7 %
Sodium 65 mg 3 %
Potassium 14 mg 0 %
Total Carbohydrate 8 g 3 %
Dietary Fiber 1 g 2 %
Sugars 1 g
Protein 2 g 4 %
Vitamin A 2 %
Vitamin C 9 %
Calcium 3 %
Iron 1 %

Repotting a Lemon Tree

The trees are blossoming and the daffodils are out, and that means the fruit trees are about to enter their growth phase for the year. So, early or not, it’s time to start tree maintenance. I had a little lemon tree in a small pot who was past due for a spacious new home, so I took an hour and made the switch.

Lemon tree very pretty
Hi, pretty.
  1. Find a suitable container.
  2. Make sure the container has adequate drainage. 
  3. Put the container in its new place.
  4. Add a layer of gravel and detritus to help keep the roots happy. Lemon trees like moist, but not damp soil.
  5. Build up the soil layer to create a base for your tree. Water the soil and pack it lightly.
  6. Remove the tree from its old pot. Shake the roots loose, and if the tree is root bound, make sure to carefully separate a few out to assist with the growth process, and to keep old roots from strangling new growth.
  7. If using solid fertilizer, add it now.
  8. Top up the soil to the same level as in the previous pot.
  9. Water again.
  10. Add mulch or ground cover to assist with moisture retention.
  11. Enjoy your beautiful tree!

The garden awakens! Or, how to plant free roses. 

We help take care of our neighbor, who in return tells us wild stories of her younger days growing up in Japan. My husband was helping clean out her yard, and ended up removing a climbing rose that was blocking access in her garden. 


We happily found it a new home on our south wall. Since it had the root system mostly intact, all we had to do was dig a hole about a foot deep, build up a little mound in the center, and place the root on top. Then I filled the hole back up, gave it a little food and water, and now I watch over the next week or so for signs of stress. We lost a bit of the root, so I’ll probably trim about a third back in the next day or so. 

Hippie Fuel

I don’t know about you, but I’m a little burnt out on soup these days. The days are getting longer here, and the crocuses have begun sprouting, but we’re still very much in comfort food weather. While I’ve happily spent most of the winter over my nabe pot, the idea of more broth at this point makes me waterlogged.

I’m still looking for something hearty though, at least until the weather makes good on the promise of spring. Enter the hippieish take on good old beans and rice. I used to take this hiking, and it pretty well kept me alive when I was in the Utah backcountry several years ago.

This super simple pantry buster (I’m into those) makes enough for dinner, or leftovers for daaaays for two.

Pantry, busted.

Makes 5-6 servings

  • 1 cup dried black beans
  • 1 cup uncooked mixed rice (you can use brown rice, but the extra fiber and texture from the mixed rice makes it worth the couple of extra cents per pound)
  • 1/2 medium onion
  • 2 tbsp tomato paste
  • 1 tbsp cumin
  • 1 tsp curry powder
  • 1/2 tsp cayenne
  • Any leftover veg
  1. Soak the beans and the rice overnight. I soak them separately since I never know how much the black beans are going to expand.
  2. Mince the onion and the leftover vegetables.
  3. Add the spices to a dry pan and heat until fragrant. Add the onion and leftover vegetables and warm through.
  4. Add the tomato paste and about half a cup of water and create a slurry. Simmer gently, and then add the rice and beans.
  5. Coat the rice and beans in the mixture, and add 3 cups of water.
  6. Cover, and cook for one hour or until the beans are tender.
  7. You should have water remaining in the pot at this point. Uncover the pot and let most, but not all of the liquid boil off, 10-15 minutes.
  8. Salt to taste, and top with olive oil, a little butter, or a fried egg.


Nutrition Information

Servings 6.0
Amount Per Serving
calories 154
% Daily Value *
Total Fat 1 g 2 %
Saturated Fat 0 g 0 %
Monounsaturated Fat 0 g
Polyunsaturated Fat 0 g
Trans Fat 0 g
Cholesterol 0 mg 0 %
Sodium 205 mg 9 %
Potassium 237 mg 7 %
Total Carbohydrate 36 g 12 %
Dietary Fiber 14 g 54 %
Sugars 3 g
Protein 9 g 18 %
Vitamin A 2 %
Vitamin C 1 %
Calcium 4 %
Iron 17 %

Preserving Parsley: 4 ways

With all the rain that fell here in Northern California, the herbs that survived the winter have exploded! Last year, I waited a little too long, and my parsley bolted before I could savor a single leaf. Rude, nature, rude. This year, February or not, I decided to make the most of my parsley before it goes to seed again.

Parsley plant
Babe, you need a haircut.

All told, I pulled about three packed cups of stems and leaves from my one plant. I left the young growth for later, and I’ll be revisiting it every couple of days to watch for buds.

Method 1: Drying

img_2998

This one’s easy. Rinse and dry the parsley, then tie 10-15 stems together with kitchen twine, leaving a long tail. Tie a loop in the tail, and hang it somewhere that gets plenty of airflow, but not a lot of light. Mine is in the kitchen near a north-facing window. It will be ready to crumble in about a month.

Method 2: Freezing

img_2999

For this, take rinsed and dried parsley, and remove the stems. (Save them for later.) Chop to your preferred texture – I went with halfway between chopped and minced. Then, grab an ice cube tray, and put about a tablespoon (loosely packed) of parsley into each section. Cover with water, and freeze for 24 hours. Store in the ice cube tray, or in a freezer bag until needed.

Method 3: Pesto

This time, I made a sunflower seed pesto, but pesto is gloriously flexible. Pretty much any soft stem herb, and any nut or seed plus a little oil and you’re in business. I was getting toward the end of my trimmings so I didn’t get as much as I would lave liked. You can easily double or triple this recipe if you have more parsley, or want to add in other tender green herbs. This makes a pretty thick pesto, too, so if you prefer yours a little thinner, you may want to thin it out with more oil or a little water.

Makes about 1/2 cup, or 4 servings

Ingredients:

  • 1 cup (packed) parsley
  • 1/4 cup raw, hulled, unsalted sunflower seeds
  • 1 garlic clove
  • 1/4 cup olive oil
  • 1/2 tsp lemon juice
  • salt to taste

img_3001

  1. Remove the stems from the leaves to make a cup of parsley leaves, packed pretty well.
  2. Add the parsley, garlic, salt, and sunflower seeds to the food processor, and pulse a few times to help chop.
  3. Add half the olive oil, and all of the lemon juice. Run the processor until everything makes a rough paste, stopping to scrape down the sides of the bowl regularly.
  4. Add the second half of the olive oil, and any extra if necessary. Continue processing until you have a smooth paste.
  5. Let rest for at least an hour to let the flavors mingle.
  6. Store in the refrigerator for  up to a week, or freeze until needed.

*Nutrition Info at the bottom of the post

Method 4: Infusion

img_3002

Still have all those stems? Use them to infuse vinegar or oil. Choose a neutral flavored oil or vinegar (I went with simple white vinegar), add stems to a jar, and cover. Let rest for at least two weeks. Use in pasta or salad dressings, pickles, or vinegar cocktails.

Good luck with your almost-spring bounty!

Nutrition Info for parsley pesto:

Amount Per Serving (2 tbsp)
calories 180
% Daily Value *
Total Fat 18 g 28 %
Saturated Fat 2 g 11 %
Monounsaturated Fat 12 g
Polyunsaturated Fat 3 g
Trans Fat 0 g
Cholesterol 0 mg 0 %
Sodium 82 mg 3 %
Potassium 156 mg 4 %
Total Carbohydrate 4 g 1 %
Dietary Fiber 1 g 5 %
Sugars 1 g
Protein 2 g 5 %
Vitamin A 25 %
Vitamin C 42 %
Calcium 3 %
Iron 8 %

Mexican Chocolate Everyday Cookies

These cookies have a tender interior, and aren’t super sweet. They’re more of a cross between a muffin top and a cookie than a decadent chocolate chip thing – an everyday cookie, if you will. They’re a great pantry buster, and while they’re not the most to look at, they’re a welcome little snack with tea or after dinner. Replace the cocoa and the spices with any combination of flavors – some good ones are orange-vanilla, raisin-cinnamon, vanilla-spice, and chocolate-dried cherry.

Makes 20 small cookies

Ingredients:

  • 100 g instant oatmeal
  • 60 g all purpose flour
  • 30 grams spent grain (sub whole wheat flour)
  • 1 tsp baking powder
  • 1/4 tsp salt
  • 2 tbsp cocoa powder
  • 1 tsp cinnamon
  • 1/4-1/2 tsp cayenne pepper, to taste
  • 1/4 tsp nutmeg
  • 1/8 tsp clove
  • 1/3 c packed brown sugar
  • 1 large egg
  • 28 g (2 tbsp) butter
  • 1/4 c unsweetened almond milk (sub literally any milk)

Instructions:

  1. Preheat oven to 350F
  2. Add all of the dry ingredients into a bowl and mix well.
  3. Then add all of the wet ingredients (no need to pre-mix the wet before adding to the dry, and I find that doing so makes blending in the butter difficult.)
  4. Mix until just combined. You should have a semi-stiff dough that holds together, but isn’t fully cohesive.
  5. Roll into balls and place 1″ apart on a lightly greased baking sheet.
  6. Press down lightly on each ball with a spoon. You’re not looking to make an indent, just flatten each cookie a bit.
  7. Bake for 12-15 minutes until the outside is set and the middle is soft, but not gooey.

Nutrition Information (per cookie):

calories  62
% Daily Value *
Total Fat 2 g 3 %
Saturated Fat 1 g 4 %
Monounsaturated Fat 1 g
Polyunsaturated Fat 0 g
Trans Fat 0 g
Cholesterol 12 mg 4 %
Sodium 117 mg 5 %
Potassium 13 mg 0 %
Total Carbohydrate 10 g 3 %
Dietary Fiber 1 g 3 %
Sugars 3 g
Protein 1 g 3 %
Vitamin A 1 %
Vitamin C 0 %
Calcium 1 %
Iron 1 %